Light-O-Rama
How to use Light-O-Rama with PulseMesh.
The PulseMesh connector for Light-O-Rama is currently in beta testing.
This page describes how you can connect Light-O-Rama to PulseMesh to play synchronized audio in realtime via the PulseMesh mobile app.
Setup
Install the Light-O-Rama Plugin
Download the installer from here.
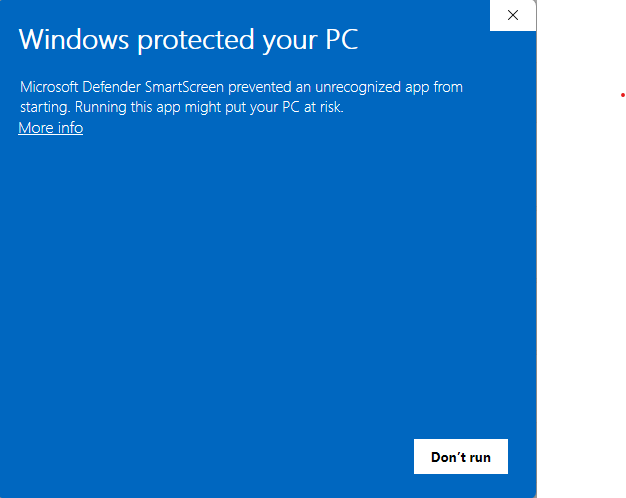
Windows Defender Warning
You may receive a Windows Defender SmartScreen warning when running the installer. This is normal for new software.
First, you'll see this warning:
Click "More info" to reveal additional options:
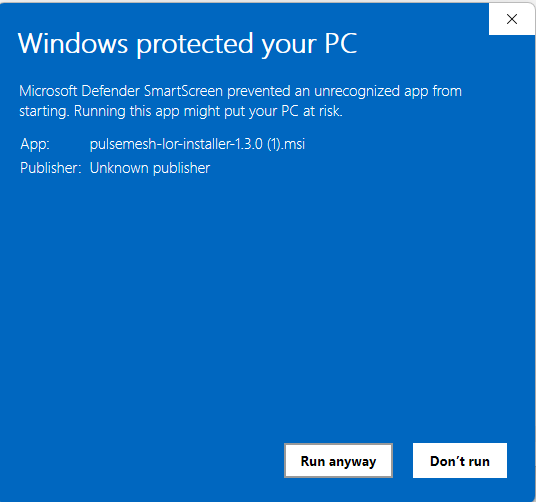
Then click "Run anyway" to proceed with the installation.
Complete Installation
Run the installer and follow the prompts. At the end of the installation, you will be prompted to restart your computer. Please restart before continuing.
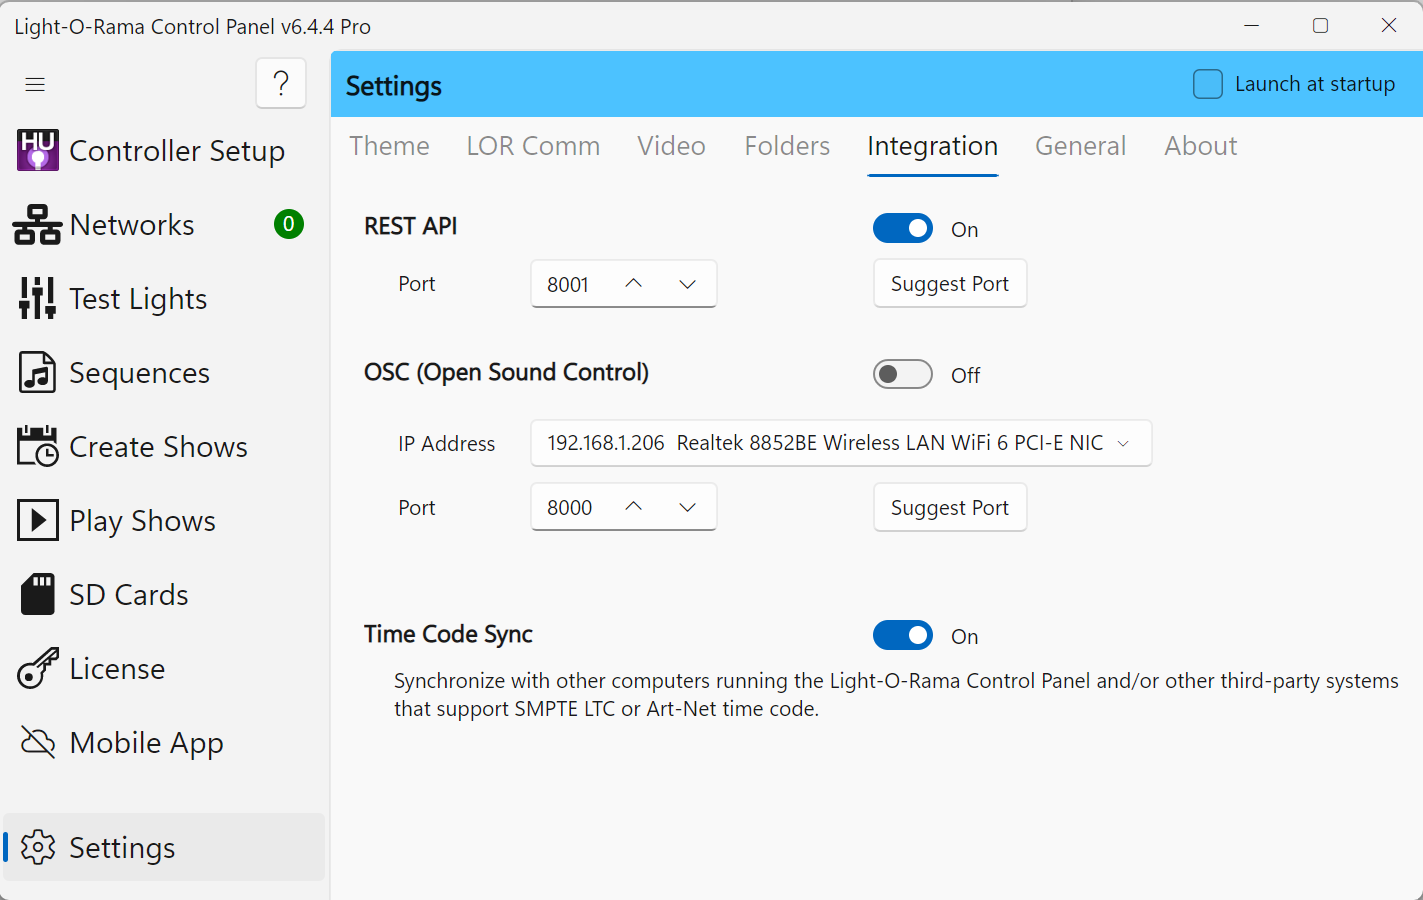
Configure Light-O-Rama Settings
Open the Light-O-Rama Control Panel and navigate to Settings > Integration tab. Enable the following settings:
- REST API: Turn this ON and ensure the Port is set to 8001
- Time Code Sync: Turn this ON
Register for a PulseMesh Account
Register if you don't have an account yet.
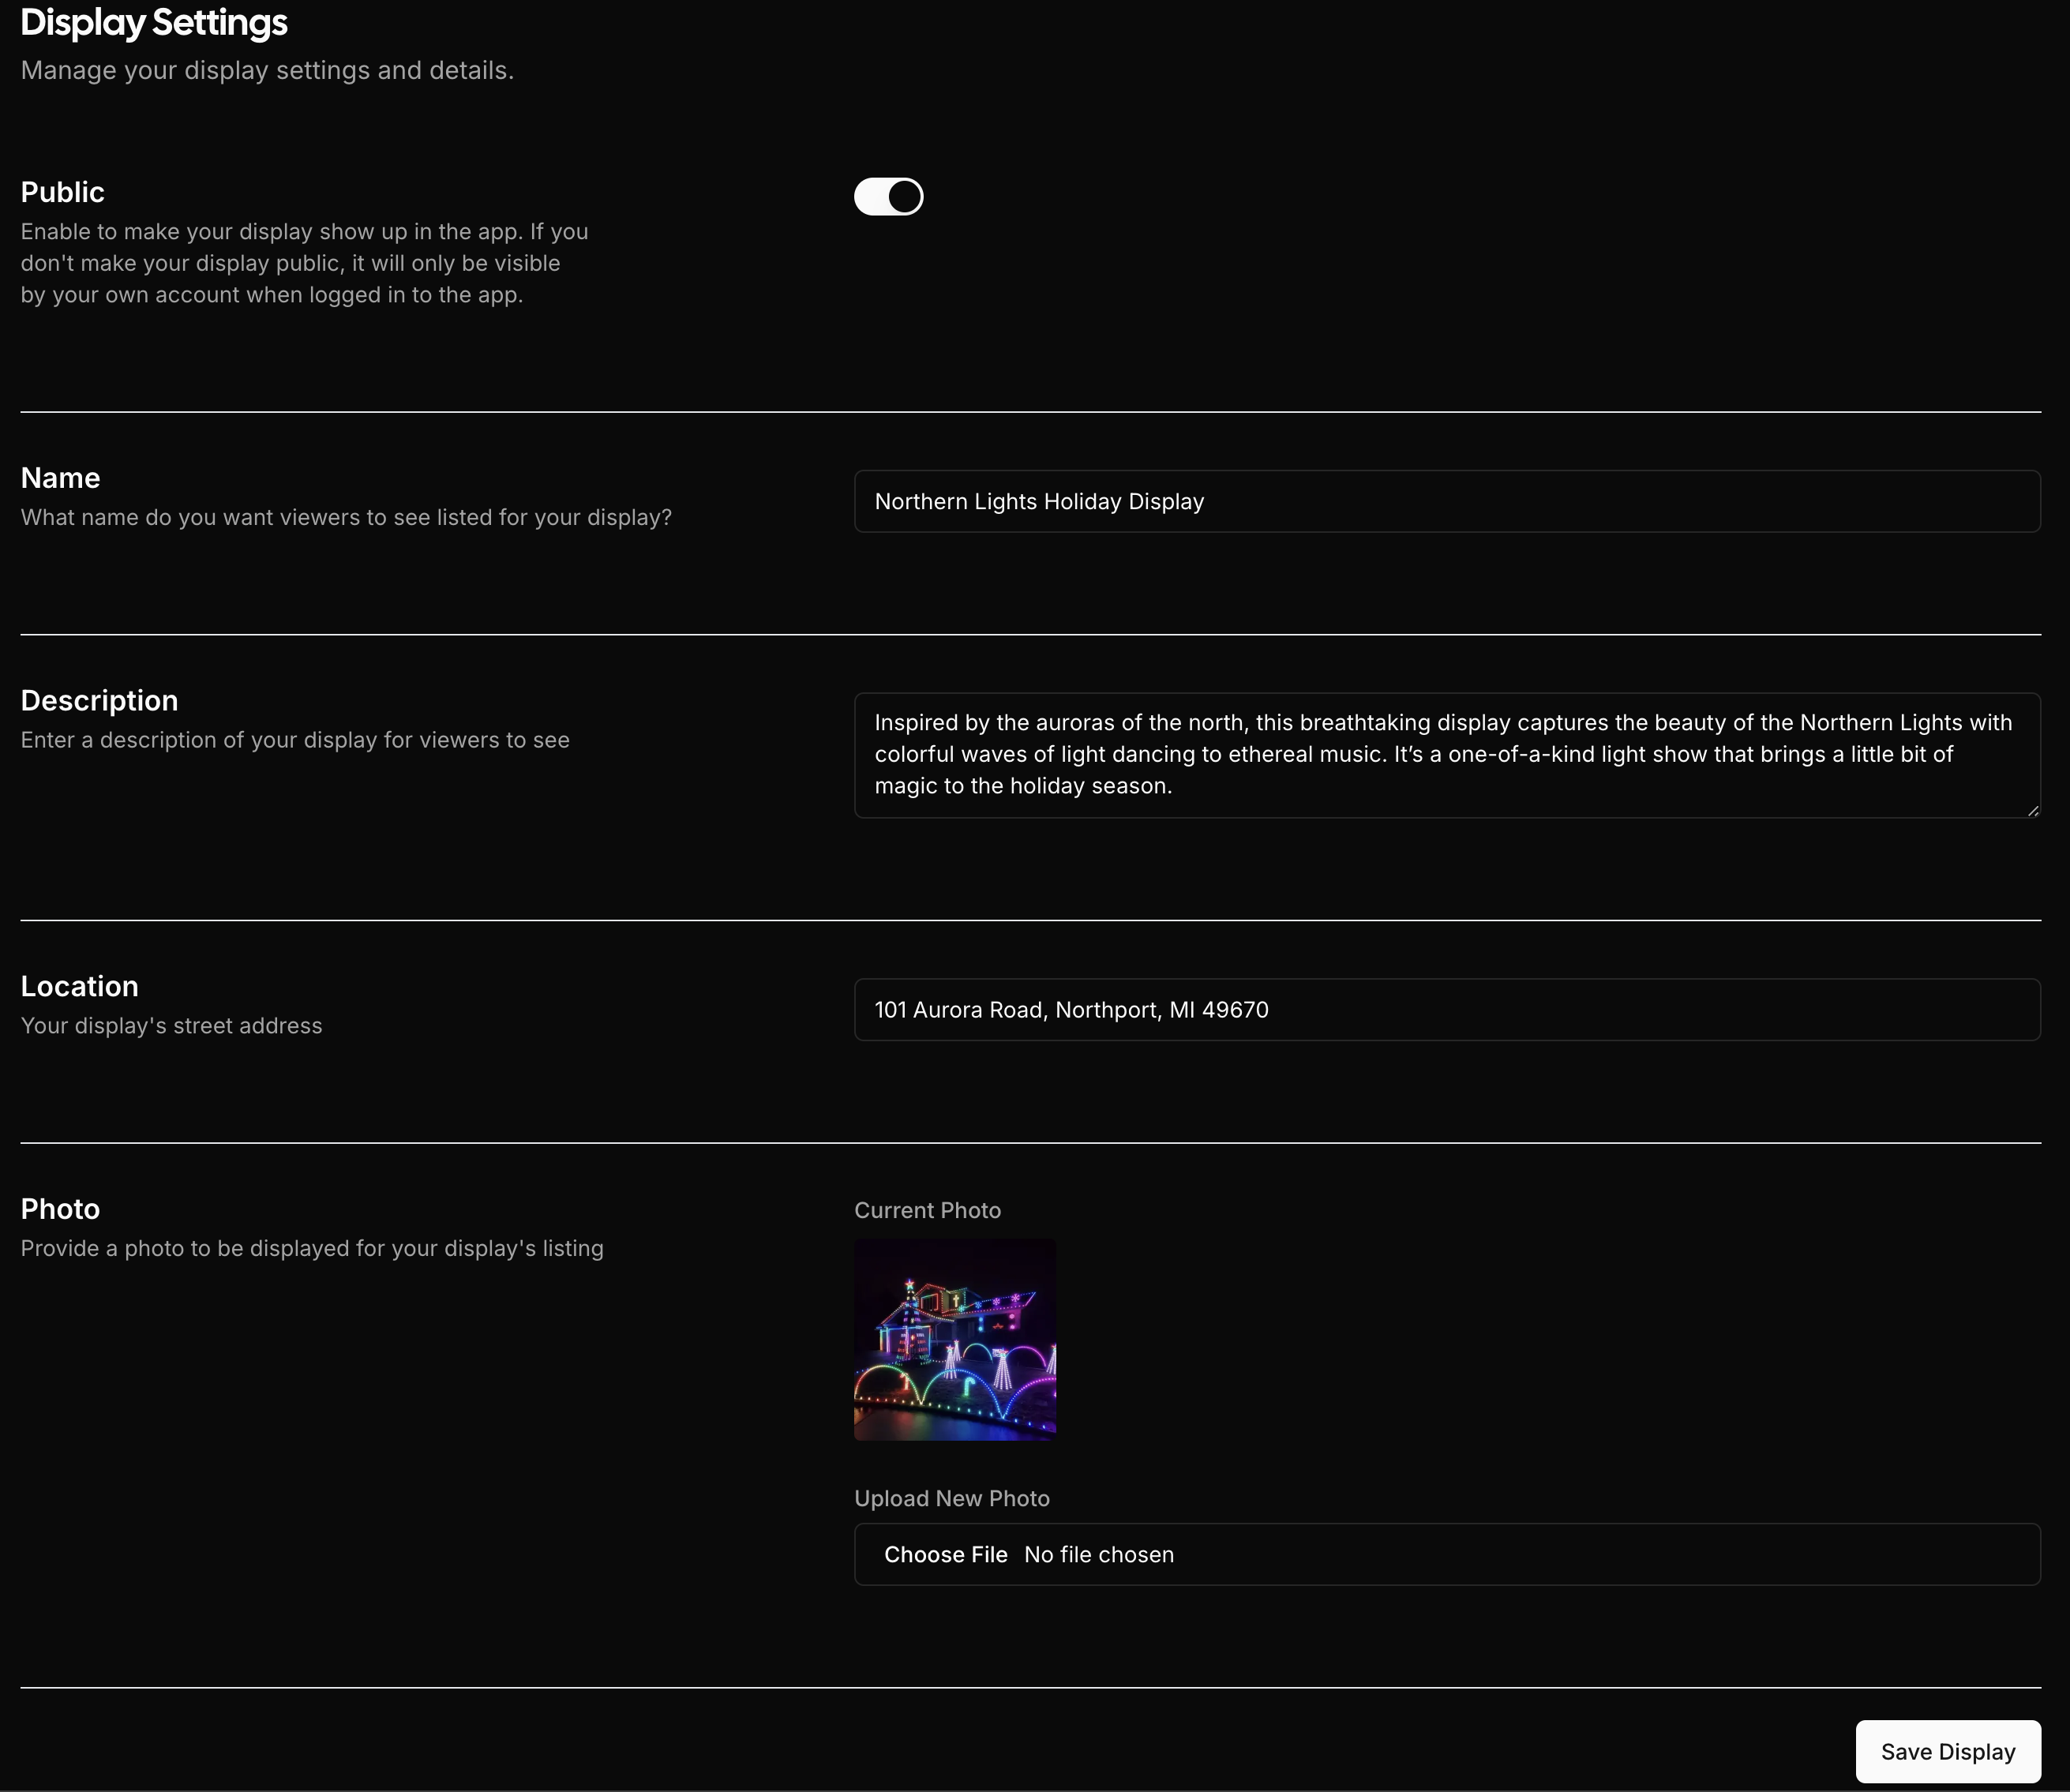
Fill in Display Details
Once logged in, navigate to the Display section. Here, you'll need to fill in the details of your display, such as the name, location, and any other relevant information. This information is used to create your display's public entry in the PulseMesh app.
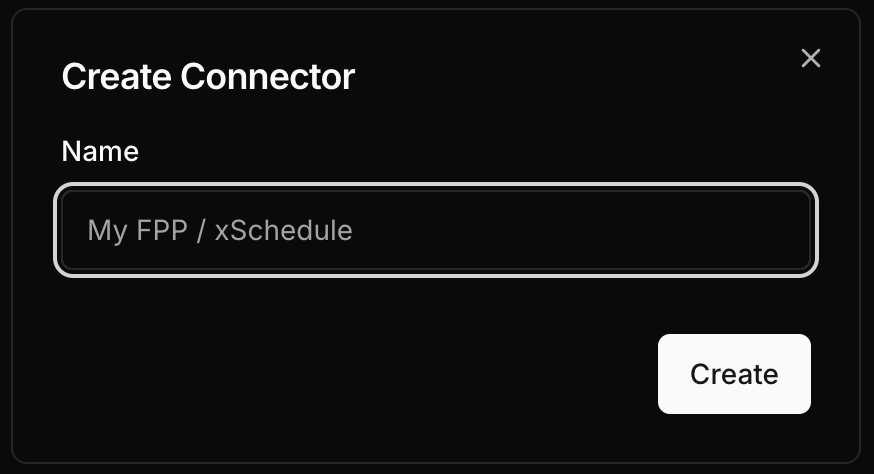
Create a Connector
Next, go to the Connector section. Click on "Create new connector" to generate a new connector for your display. The name is for your own reference only and is not shown to viewers. This connector will represent your Light-O-Rama instance to PulseMesh.
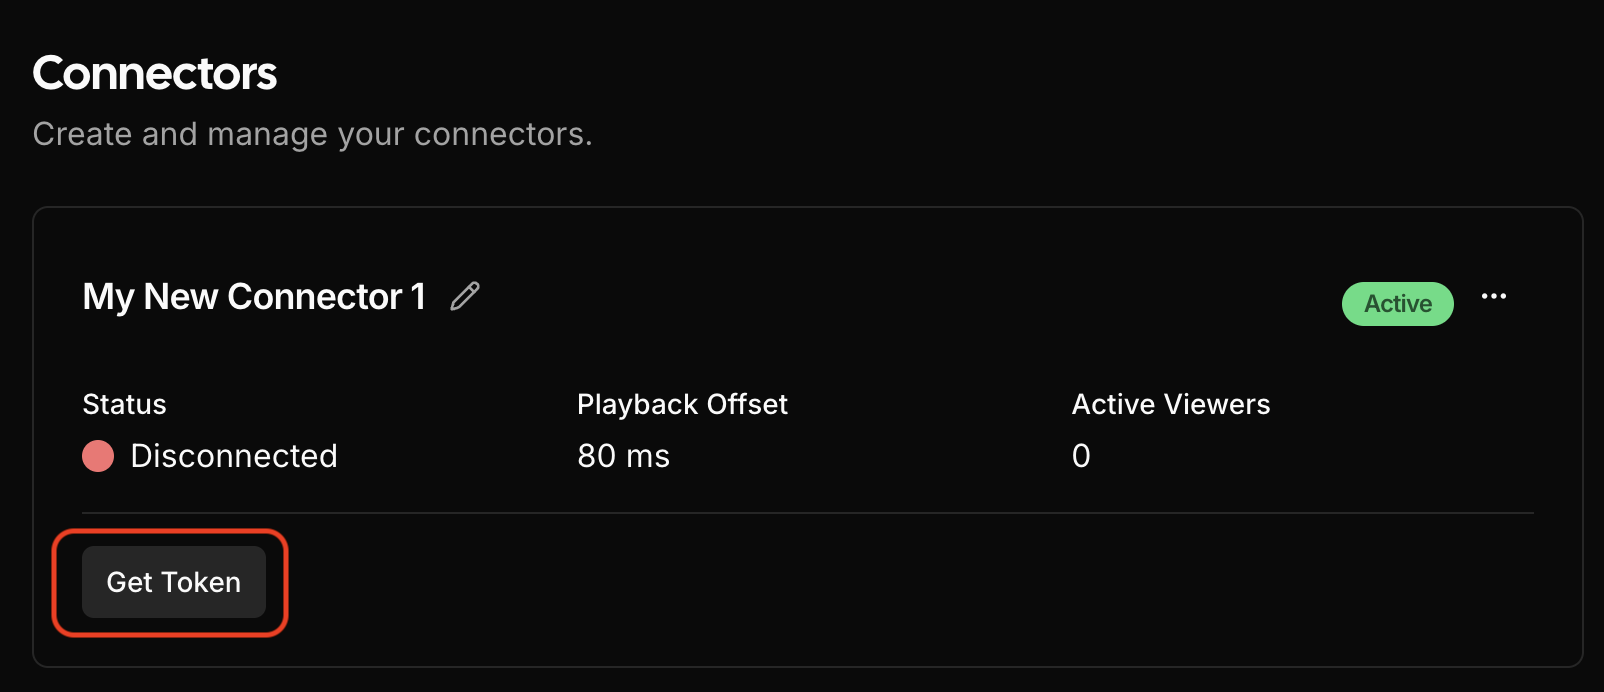
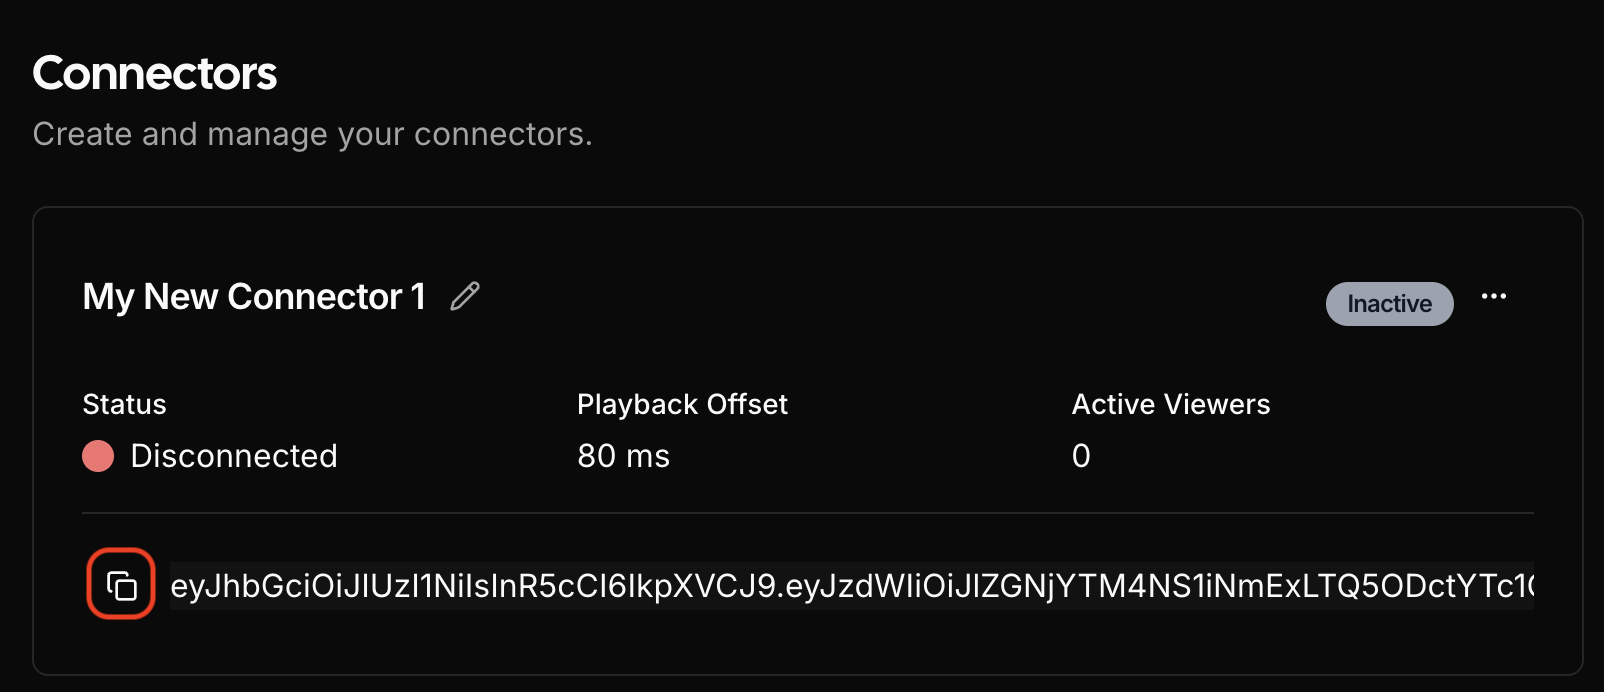
Copy the Token
After creating the connector you will see a button at the bottom of the connector card that reads Get Token. Click the button and the token will be revealed. Either click the copy button at the far left or select the token and copy it.
First, get the token.
Then copy the token to your clipboard.
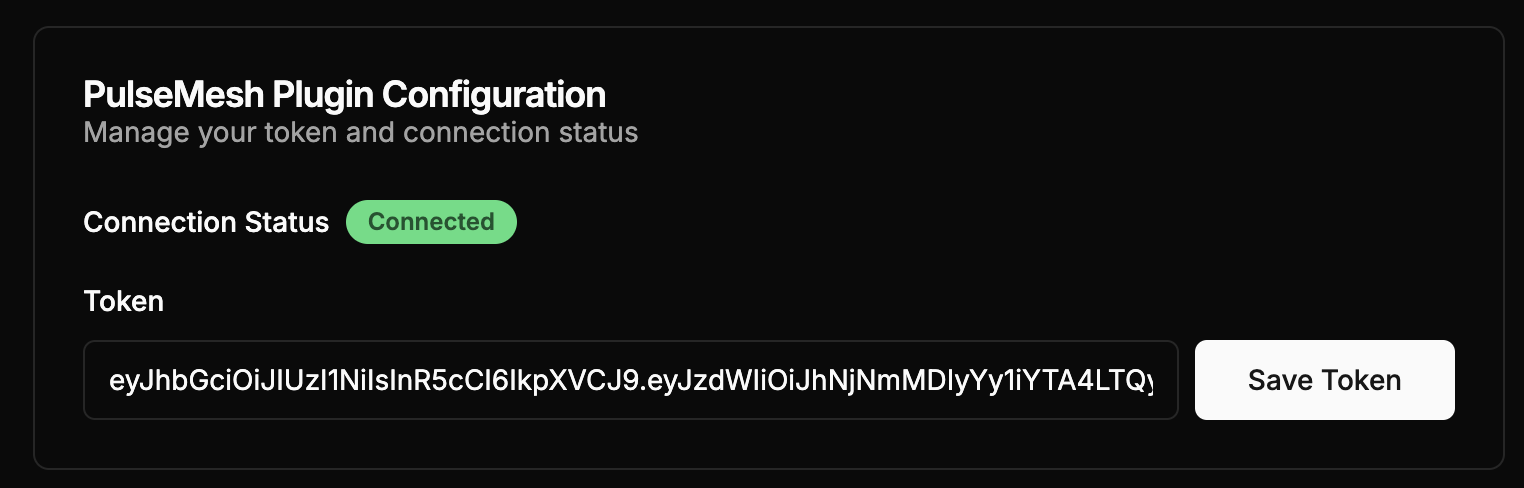
Paste the Token into PulseMesh Configuration
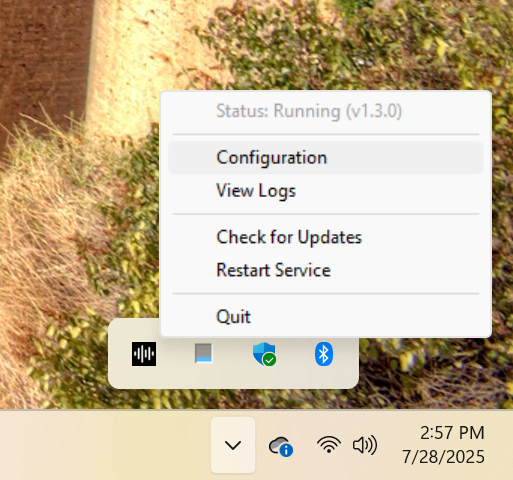
After installation, you'll see a PulseMesh icon in your system tray (bottom right corner of your screen). Right-click on the icon to open the menu and click "Configuration" to launch the connector configuration.
In the configuration window that opens, paste the token you copied into the Token field and click the save button.
At this point Light-O-Rama should be connected to PulseMesh. You should see the connected status above the token field change to "Connected".
Confirm Connection (optional)
You can also return to the Connector page to see your newly connected Light-O-Rama now has a status of Connected, indicating that the setup is successful. Refresh the page if you don't see the Connected status.
Configure Show Timecodes
For PulseMesh to work correctly with Light-O-Rama, each sequence in your show must have a unique, non-overlapping timecode. This tells PulseMesh when each song should play.
Important: Timecodes only need to be unique within each show, not across different shows. If you use the same sequence in multiple shows, it can have the same timecode in each show, or different timecodes - either approach works fine.
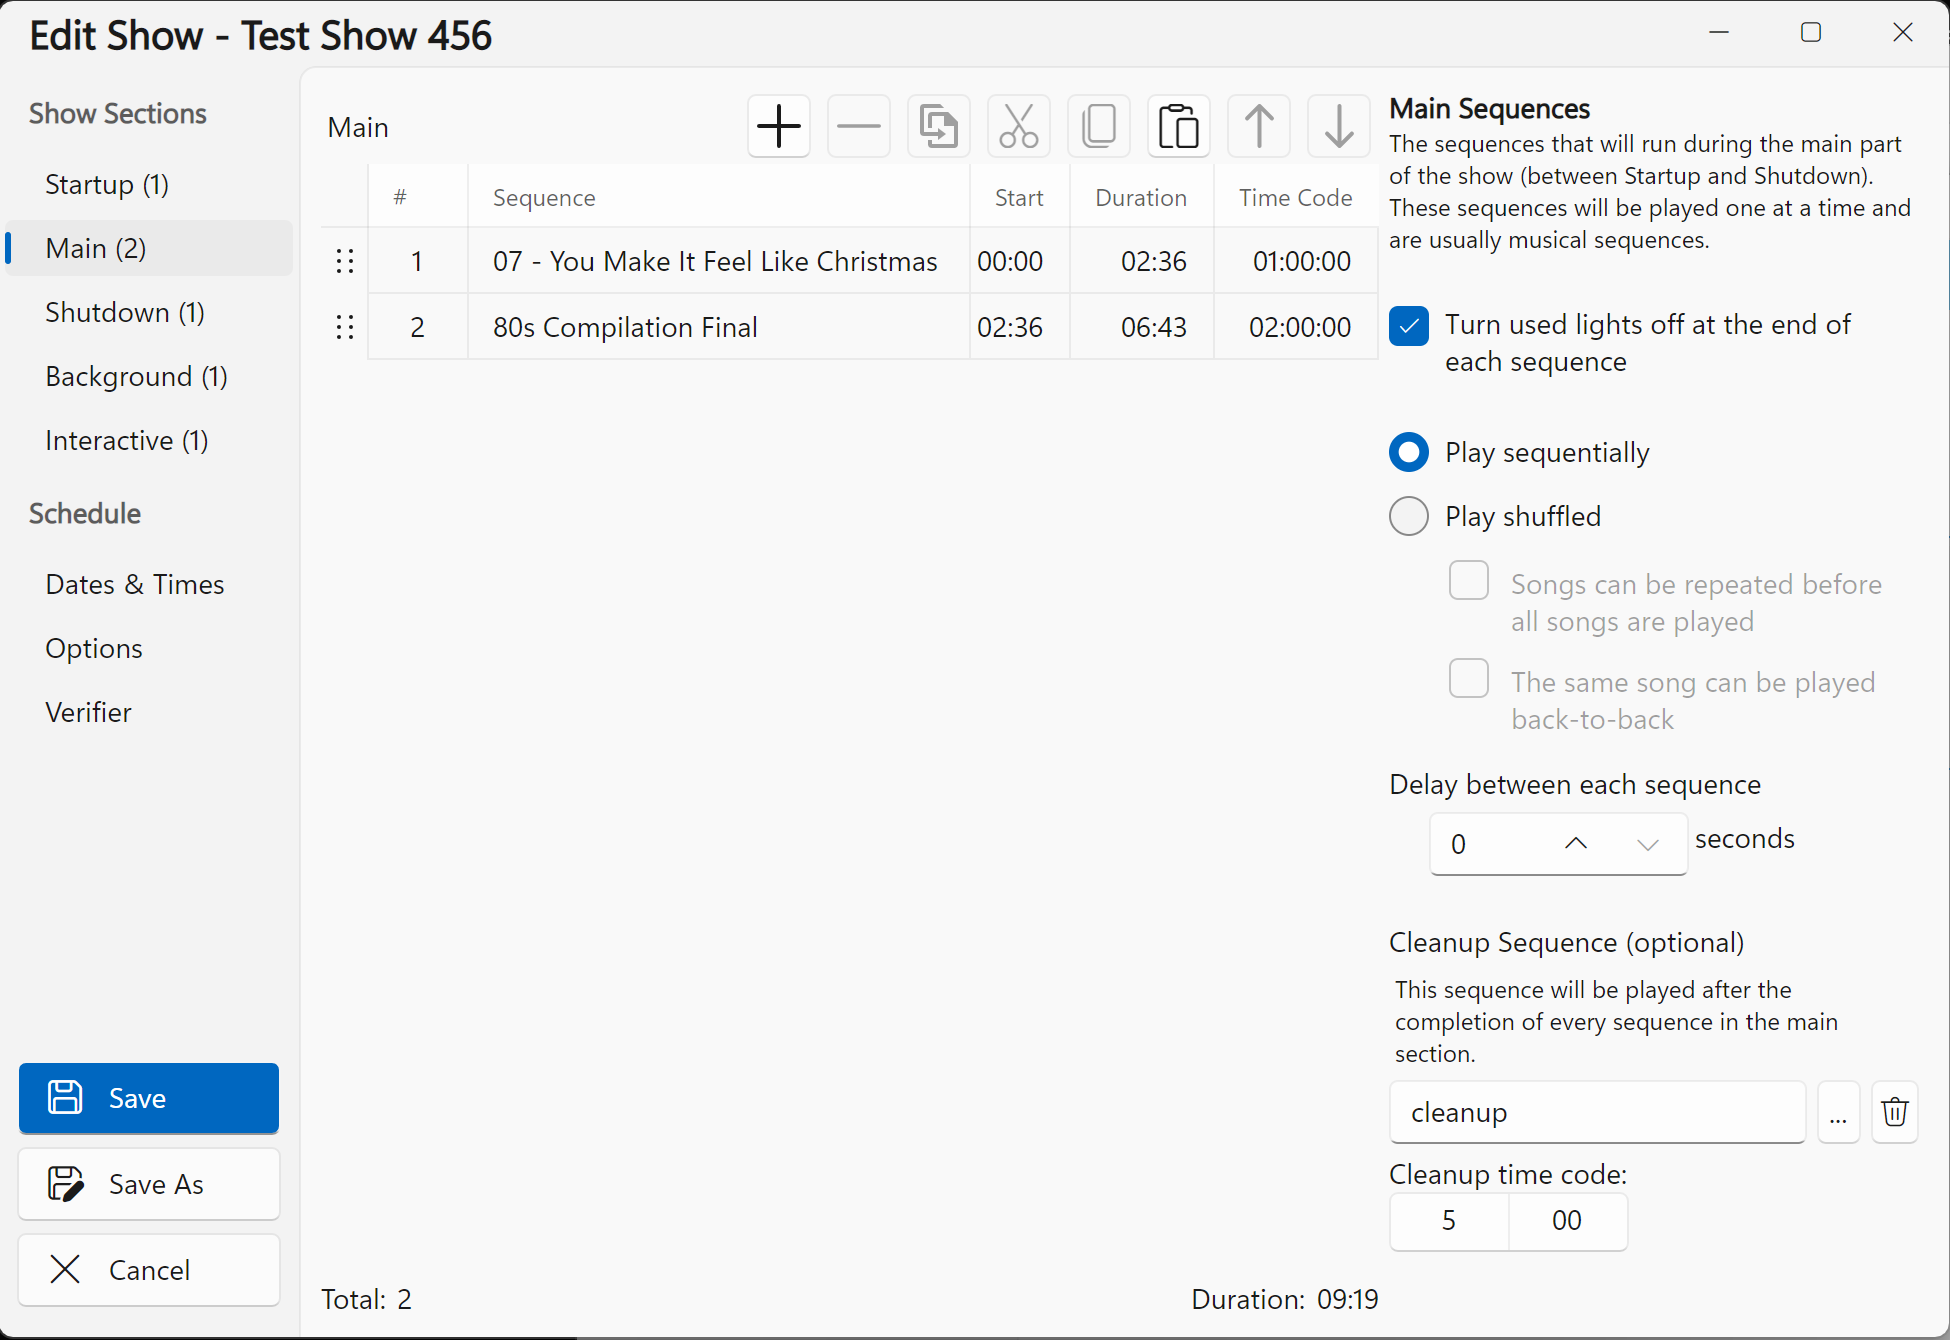
Setting Timecodes
In your Light-O-Rama show editor:
- Click on each sequence in your Main Sequences list
- Set a unique "Time Code" for each sequence
- Ensure timecodes don't overlap
Simple approach for up to 24 songs:
- First song: 01:00:00
- Second song: 02:00:00
- Third song: 03:00:00
- Continue with 1-hour blocks...
For more than 24 songs: You'll need to use smaller time blocks. For example, with 30-minute blocks:
- First song: 00:00:00
- Second song: 00:30:00
- Third song: 01:00:00
- Fourth song: 01:30:00
The important thing is that each sequence has its own unique timecode window that doesn't overlap with any other sequence.
Configure Show Player for Sync
When playing your shows, you must use a sync leader mode for PulseMesh to receive timecodes. In the Light-O-Rama Control Panel, go to Play Shows.
Important: If you already have a player loaded (Show Player Standard or Cue List Player), you must first click "Disable Player" in the upper right corner before you can select a sync leader mode.
After disabling any existing player, select either:
- Show Player Sync Leader, or
- Cue List Sync Leader
Do not use "Show Player (Standard)" or "Cue List Player" as these modes will not send timecodes to PulseMesh.
Once you select a sync leader mode, configure the following settings:
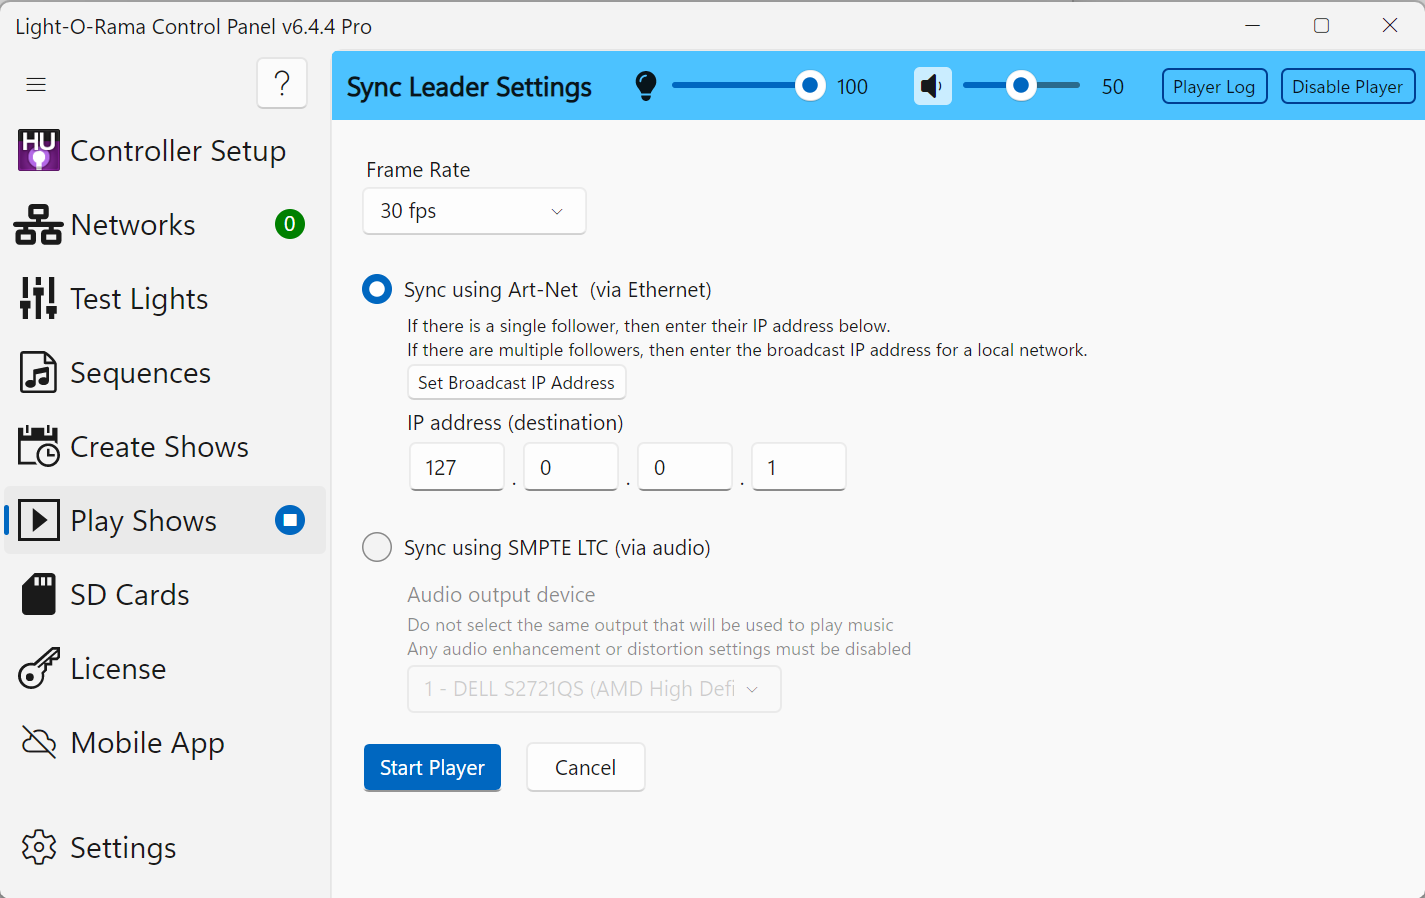
- Frame Rate: Set to 30 fps
- Sync using Art-Net: Select this option
- IP address (destination): Set to 127.0.0.1 (this sends sync packets locally to PulseMesh)
Click "Start Player" to begin your show with proper timecode synchronization.
Test it out
Start playing a sequence on Light-O-Rama, then open the PulseMesh app or the PulseMesh web player to hear the playback.
Consider Joining the Facebook Group
There's an active Facebook community dedicated to discussing PulseMesh.
Troubleshooting
If things aren't working after following the steps above, please review the solutions below. If you continue to run into issues, feel free to reach out to us at [email protected].
Connector doesn't show connected status
If the connector remains in a disconnected state after adding the token then investigate the log file. To view the log file, right-click the PulseMesh icon in your system tray and select "View Logs". This should give you an indication if the token was copied incorrectly ("Authentication failed" error) or if some other issue exists such as a lack of internet connectivity.
Also verify that both REST API and Time Code Sync are enabled in the Light-O-Rama Control Panel Settings > Integration tab.
One or more songs are not being played through the app or web player
Right-click the PulseMesh icon in your system tray and select "Configuration". In the Debug Information section check if "Files Pending Upload" is 0. If it is not, wait until the upload process is finished and try again.
If you don't hear playback through the app immediately that could be because your audio files are still being processed for playback. You may want to wait 20 minutes and try again. The more files you have, or the slower your upload speed, the longer the processing may take.
Your display doesn't show up on the app or web player
Ensure your display is set to Public on the Display page. If public is not toggled on you display will not show up in any of the players. Also ensure you have provided the correct address for your display.